Showing posts with label filmscanner. Show all posts

2/06/2012

Canon CanoScan 4200F Flatbed Scanner Review

Canon CanoScan 4200F Flatbed Scanner
Average Reviews:

(More customer reviews)
I simply love the Canon CanoScan 4200F flat scanner for prints and films. It's fast (both in scanning and transfering to the PC), quiet, and has superb scan quality, esp. on 35mm negatives. (I haven't tried scanning 35mm slide films.)
Setting the 4200F up is pretty much a breeze, assuming you have Windows XP. (Windows 98 users will need to follow the instructions very carefully.) You first install the software -- the scanner driver and the scan toolbar (called "toolbox") are the only programs necessary for using the scanner; the other applications (photo editing, OCR and Adobe Acrobat) are optional. After restarting your machine (so the scanner driver loads and runs as a service), just connect the USB 2.0 hi-speed cable, and you are set to go.
Using the scanner is also quite simple. You can scan in three ways: directly from your photo organizing or editing program (assuming it supports the universal TWAIN interface, which most imaging programs worth their pennies do); using the Canon Scan Toolbox; or pressing one of the four buttons on the scanner itself, which calls up the toolbox and automatically initiates a scan.
The four buttons are:
- Copy. Your PC must be connected to a powered-on printer for this to work. When you press copy, the Canon scans and sends the file directly to your printer.
- Scan. This is the button for scanning. When you press it, the Canon scans and sends the scanned image to your designated photo editing program, which you specify once via the toolbox. (This button corresponds to the "Scan 1" icon on the toolbox.)
- PDF. This turns the scanned image into a PDF file.
- E-mail. This button scans and then calls up Outlook Express or Outlook with the image embedded as a JPEG attachment.
The toolbox (toolbar) has more options for scanning. All are pretty straightforward. Each option can be configured in detail, or you can specify that all the settings be done in the driver itself. (The toolbox is simply an interface to the driver.) If you configure things in the driver, you'll even be able to adjust how the scanned image should look, in terms of color, contrast, sharpness, etc., etc. The options are endless, but in the beginning, using the toolbox makes scanning a breeze and less intimidating.
One thing cool about the Canon is how it makes it easy to understand what resolution you should scan in. First, the 4200F is capable of 3200x6400 dpi (dots per inch). The 3200 dpi is its true optical resolution; that's how much fine details it can detect. The second number, 6400 dpi, refers to its "stepping" levels, which basically means the sensor can sample each inch 6400 times, but only detects up to 3200 dots. When you scan, the Canon asks you what *output* resolution and size you want, and then calculates the necessary input resolution for you. Say you are scanning a 4x6" photo but want to be able to print it 4 times as large (or twice the width and length, i.e., 8x12") and print at 300 dpi. The Canon will then automatically set the correct scan resolution of 600 dpi -- which is twice as much as printing 4x6 at 300 dpi. So you'll get a 2400x3600 file in pixels, which can then be printed at 8x12" at 300 dpi (2400/8=3600/12=300dpi). This concept of specifying output resolution rather than worrying about input resolution works esp. well for scanning negatives. Say you are scanning a 35mm negative. It'd be a pain to figure out which scanning resolution is best. But if you know you'd eventually want to print a 4x6" photo in 200 dpi, just tell the driver so, and the driver will do all the work for you and scan properly.
Another feature I love is multi-scan, which lets you scan in several pictures at once and the driver automatically separates them. Here's how I use my 4200F:
I set up the scan button so it's linked to Adobe Photoshop Elements 3's organizer. (You can link the button to any TWAIN-compatible program.) When I press the button, the scanner automatically scans multiple pictures I place on the glass, and separates them (and straightens them if necessary) into individual pictures. I have a checkbox called "confirmation of EXIF" checked, which allows me an opportunity to scan in more pictures before sending them all at once to Photoshop Elements 3. This really saves me a lot of time, without having to switch between the scanner driver and Photoshop Elements after each scan. Finally, when I'm done with scanning all the photos, I click the Forward button, and the driver automatically launches Adobe Photoshop Elements (if it's not already open) or switches to it, and sends over the newly scanned pictures. This process works equally well for photo prints and negatives. It sounds longer than it actually is. As with any scanning, it's replacing the photos on the glass or in the negative holder that is the most time-consuming part.
Compared to my previous scanners and even many more expensive scannesr on the market today, the CanoScan 4200F is lightyears ahead in scan quality, speed and quietness. The driver software has both a "simple mode" for easy scanning and an "advanced mode" for more fine-tuned scanning. The driver has been totally stable. I simply love this scanner. Finally, I will be able to scan in all my old photos.
The only downside I can think of is the lack of a printed user's manual. The 4200F comes with a quick-start guide that covers installing the software and doing a test scan. The HTML user's guide has lots of details, but because it's not PDF, it's almost impossible to print out.

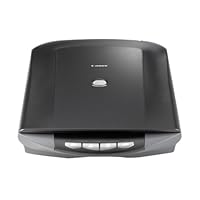
Click Here to see more reviews about: Canon CanoScan 4200F Flatbed Scanner

Canon CANOSCAN 4200F 3200X6400 DPI FLATBED SCANNER

Buy Now

Click here for more information about Canon CanoScan 4200F Flatbed Scanner

Read More...

1/19/2012

Nikon CoolScan V LS-50 ED Film Scanner Review

Nikon CoolScan V LS-50 ED Film Scanner
Average Reviews:

(More customer reviews)
The Coolscan V is an excellent cheaper alternative to the Coolscan 5000 which I have also owned. My immediate project included about 1500 slides from my own collection, my fathers collection, and my grandfather's collection.
Most of my father's slides are Kodachrome. Much has been written about the inability of this scanner to scan Kodachrome slides and said about ICE4 not working with Kodachrome. Well, I have some good news The ICE4 does work extremely well for the most part. However, with Kodachrome slides it does produce minor artifacts in about 5 percent of the slides. I scanned with ICE (not ICE4) always on and then rescanned if I encountered unacceptable artifacts. I did notice that the scanner ICE feature was more likely to be stumped by old Kodachrome slides where subjects were wearing shirts with stripes.
The GEM ROC and DEE (the other stalwarts of the ICE4 other than ICE itself) work on Kodachrome slides as well, but I found that the results were unpredictable and that I could achieve better results myself in Photoshop far more quickly. The GEM ROC and DEE features simply took too long and slowed down the scanning unacceptably. The results, for me, were not worth the additional scanning time. So I never used these features. But the "enhance" feature on the scanner I used nearly 100% of the time with great results - much better than the GEM ROC and DEE features.
The scanner is fast and does produce wonderful wonderful detailed scans, easily demonstrating the grain in the transparancies at 3000 and 4000 dpi. The Kodachrome slides were a challenge to the Dynamic Range of the scanner, but I believe that most of the detail in the shadows that is there was extracted. With dark slides I used the VERY useful gain feature turning it all the way up to 2 in the really dark slides. Unfortunately, Kodachrome, with all of its many attributes, does have substantial downsides including a very narrow exposure latitude and shadow detail is simply lacking. I think the scanner accurately reproduced the information including the colors on the Kodachrome slides, with perhaps a slight bluish cast noticed in some cases.
It wasn't until I was finished scanning all of the culled slides that I undertook to scan my select color negatives. And this scanner really came into its own scanning color negatives. Don't even TRY to scan color negatives without ICE because the results are unbelievably bad. Even pristine negatives have scratches and dust that magically are erased by the ICE feature. What a godsend. The scanned color negatives were just beautiful with very accurate color rendition. But immediately I noticed much more grain in the color negatives (Royal Gold and Fuji Superia Gold) than in the scanned slides.
One note unrelated to the scanner itself. Until you've used a digital scanner to scan your color negatives you can't begin to realize how far superior Kodachrome, Provia, and Ektachrome slides are to color negatives insofar as capturing detail. Even the best color negatives have much more grain that Kodachrome. And the difference in color negatives is substantial too.
The V was slower than the 5000, but honestly the difference for the non-professional scanner, to me, was not worth the additional investment. The V represents a superb value giving you nearly all of the advantages of the 5000 other than speed for a substantially cheaper price.
The included Nikon software worked fantastic for me. I downloaded a copy of VueScan which according to many reviews is superior to the Nikon software and found that for me the Nikon software was easier to work with and produced superior results.
Setup Summary: I scanned at a 16 bit color depth and 4000 pixels per inch with the scan enhancer turned on and the Digital ICE turned on. I did not use GEM ROC and DEE because of inconsistent results. I turned up the gain as necessary for dark slides and turned it down for light slides. Gain adjustments were only necessary on about 15 - 20% of the slides.
Setting up the Nikon Scan window was a little tricky too. I placed the tool palette in the far upper right corner of the window with the scan window placed under it to the right. The image window occupied the largest portion space to the left.
I can recommend this scanner without reservation. It is a phenomenal piece of equipment. If speed is not a paramount consideration and you are not a professional scanner needing the options (the auto feeder) offered by the 5000 then, in my opinion, the V represents an absolutely tremendous value.

Click Here to see more reviews about: Nikon CoolScan V LS-50 ED Film Scanner

A high-performance dedicated film scanner from Nikon, the CoolScan V ED offers high-quality scanning of 35mm slides, 35mm film strips, APS film (with optional IX240 film adapter), and prepared slides (with optional medical slide holder). The Scanner-Nikkor ED glass lens offers a 4,000 dpi optical resolution, while the 3,964-pixel linear CCD image sensor and 14-bit A/D input (8-/16-bit output) provide true-to-life, brilliant results.
Nikon's own LED illumination technology ensures accurate color with no warm-up time or risk of heat damage. Scan times are as fast as 38 seconds including image transfer to display, and as fast as 14 seconds in preview mode. Automatic color/contrast compensation helps you achieve accurate results, while the ICE4 advanced digital image correction suite of technologies helps to restore old slides to their original glory. Additionally, the included Nikon Scan 4 software provides a comprehensive and easy-to-use interface for managing your scans.
The CoolScan V ED has a convenient plug-and-play USB interface, while one-touch scan and preview buttons will have you scanning film in no time. PC and Mac compatible, the CoolScan V ED also comes backed with a one year limited warranty.
What's in the Box Scanner, CD-ROM, strip film adapter SA-21, slide feeder MA-21, instructions

Buy Now

Click here for more information about Nikon CoolScan V LS-50 ED Film Scanner

Read More...

1/05/2012

Pacific Image Electronics PF3650U Scanner, Primefilm 35MM Review

Pacific Image Electronics PF3650U Scanner, Primefilm 35MM
Average Reviews:

(More customer reviews)
This is a great machine, and I'd recommend it to anyone who has a need to scan a relatively small number of slides and negatives. I'd have rated it five stars save for a single problem with the directions.
The one problem that I have with this product is the installation directions. They did not work for me when I followed them to the letter on my Win98SE machine. While all indications were "GO", neither one of my twain-complaint software programs - Paint Shop Pro 7 and the Adobe Photoshop Elements 2 included in the box with the scanner - would recognize the existence of the Pacific Image 3650u scanner, though both programs recognized my other two scanners. Frustration led me to request a refund!
But, I made one last try, and inadvertently, contrary to the directions, had the 3650u powered up during installation of the Cyber-X update I downloaded from Pacific Image's website. That did the trick! After a reboot all of the software recognized the 3650u scanner. After that, it was smooth sailing, exactly as advertised.

Click Here to see more reviews about: Pacific Image Electronics PF3650U Scanner, Primefilm 35MM


Buy NowGet 4% OFF

Click here for more information about Pacific Image Electronics PF3650U Scanner, Primefilm 35MM

Read More...

10/05/2011

Plustek Opticfilm 7600I Ai Review

Plustek Opticfilm 7600I Ai
Average Reviews:

(More customer reviews)
I'm still at the bottom of a very steep learning curve. The good news is the Plustek scanner and the comes-with software started up and ran with minimal fuss on my old G4 Macintosh. I've been able to get a few decent, useable scans after a modicum of fussing around.
But I'm overwhelmed and intimidated by the incredible number of adjustments that can be made in SilverFast AI Studio -- the software package that takes the input from the scanner and turns it into digital files, with corrections. There are video introductions to the features of SilverFast, but that is all they are -- introductions. If you aren't familiar with the intricacies of digital image processing and color correction you are going to feel very lost.
You can find a link to a very large -- 480 page -- PDF file on the SilverFast website that purports to be a complete manual to the software. But then there is also a 48-page addendum. You can download these for free. But you can't buy a printed manual. It isn't offered in hard copy.
SilverFast isn't the only company that feels providing a PDF file is providing documentation. Far from it. But it appears they used to provide a printed manual, of course at extra cost. Not any more.
I'd pay the money to get a printed manual. Even if it is the size of a dictionary. No one yet has solved the problem of providing clear, comprehensive directions on the same screen where you are trying to work. A printed manual is still an extremely useful tool. The only downside is they are hard to keep current.
Eventually I hope to scan and archive my thousands of 35mm color negatives. It's a big job, but I can peck away at it, for years if necessary. What I'd really hate is doing all that work and finding out, towards the end, that I didn't set up my scans properly. With all the knobs, buttons and sliders the chance of lucking into the right settings is almost zero.
I'll update this review if I find a good, useable, comprehensive guide that gets me comfortable with my scanning software. Or if I don't.
I'll probably end up printing out the PDF manual, hole-punching it, and putting it in a (huge!) 3-ring binder. It would be nice if it were well-written, clearly illustrated and comprehensive, but I'm not confident it will be.
It would be even nicer if David Pogue put out a "Missing Manual" on SilverFast AI. The "Missing Manual" series is the very, very best. But I'm not holding my breath.
***************
Update April 2, 2010
I have, in fact, printed out the 480-page PDF manual. It is now in a 3-ring binder. I've been studying it, but I can't say it has helped me that much.
Mostly what I have learned is that there are a ton of features in SilverFast Ai that I don't need and will never use. I am starting to get an inkling of what I do need and can use, but what looked like a learning curve before looks more now like a learning cliff. I'm at the bottom, looking up, with no idea how to get from where I am to where I'd like to go. The manual assumes that the user has so much knowledge going in that the text is all but unintelligible. It makes it extremely difficult to figure out what is important to me and what isn't, which settings are appropriate and which aren't.
What I really need is a task-oriented guide. Something that says, if you want to archive negatives, you do this, this and this. If you want to do additional processing to your archived negatives, once you have scanned and saved them, then you have these tools available, this is what they do, and this is how to use them.
I suppose there are places I can find this information -- possibly online user forums -- but I'm going to have to hunt for them, and then see if I can figure out how to ask the right questions of the right people. And really hope someone is willing to be helpful.
It annoys me that Plustek and SilverFast don't understand that there are people like me who, as amateur photographers with lots of photographs they want to preserve -- willing to pay the money and put in the time to do so -- need just a little guidance in how to get started.
I've encountered this kind of "we're all professionals here" attitude before, primarily in the CAD world. I don't understand it. There are a hundred potential sub-professional users for every professional, and we're not stupid, or poor. We just have more basic needs. We don't have the luxury of living and breathing this stuff every hour of our working lives. A little consideration would be appreciated.
It is really very insulting that these vendors don't consider sub-professional users to be a market. How can they be so blind to such a huge potential? I don't know, but if they're like the CAD folks, they're really, really good at being blind.
I am going to try to send this review to Plustek and SilverFast. Maybe they'll take pity on me. Here's hoping.
****************
Update May 1, 2010
I really have to split this review into two parts: the hardware and the software.
I have no complaints about the hardware. The Plustek Opticfilm 7600i works and works well. I am very happy with the unit.
I have given up on the software. The SilverFast software may be a terrific toolset for the professional who is immersed in this stuff every day, all day, but for anybody else I think they'll find it is pointlessly difficult to understand and use. On top of that I received no support from SilverFast. None worth mentioning. A very form-letterish response to my email is all, not telling me anything new or useful.
Fortunately the folks at Plustek are much, much more supportive. One of their tech support people spent, frankly, far too much time talking to me, trying to get me up to speed with SilverFast. Ultimately the best advice he gave me was to try another brand of software, 'VueScan' (available at [...]). VueScan was designed to be fully-featured but 'discoverable'. That is, an intelligent person who knows what he wants to do can figure out how to do it, without learning a whole new language and a whole new way of thinking. You can start at a pretty basic level and get very good results. As you get more experienced you can dive deeper, a bit at a time, and be rewarded with more and more capability, with a good chance of success on your first try.
VueScan comes with an 'Archive' setting. That feature in itself shows someone gave thought to the needs of the poor befuddled user. The rest of the features in VueScan are in line with that level of consideration for the user. And it doesn't seem to me like there are any features missing from VueScan that are found in SilverFast. If there are, they are pretty arcane.
You can try out VueScan for free, and you can buy a limited license for US$40. But that license only lasts you a year. You are much better off buying the Professional license -- a one-time charge of US$80 with unlimited free upgrades.
VueScan comes with personal email support. I've tried it, and got a helpful response. Apparently the guy who wrote and maintains the software also answers user questions. I like that kind of customer support!
So, I've upgraded my review to 4 stars out of 5. The comes-with software is a disappointment. I'd really like to get my money back. I'll try to see if I can. But lousy comes-with software seems to be a tradition in optical products. At least there is a good alternative. The bad news -- you have to pay extra for it. The good news -- it is worth the money.

Click Here to see more reviews about: Plustek Opticfilm 7600I Ai


Buy NowGet 27% OFF

Click here for more information about Plustek Opticfilm 7600I Ai

Read More...